

So, this just happened....I put all of everything that is important to me on the back burner and busted out not one but three chairs for my daughter...and her brother and sister. How did this come about? This will give a little insight into the way my brain works....when something comes to me that just really gets all of my receptors firing, I just...have...to....do...it. More on this weird behavior later (link will be added later) since I began working as a design teacher and also running my online biz, i.e. my priorities have been shifted.
So, it all started with me seeing these posts about how people have SOO much space in their house for their kids to have a place to put their backpack, lunch bag, jacket, shoes, etc all in one place. Moms are putting together these bookshelves and modifying them to have this space for their kids. They are called Back to School bookshelf organizers. I had seen this before and was bothered by how challenging it was to get my daughter to find 2 of the same shoe and to find her jacket etc. So I did go and put command hooks around in different places to hang her stuff but it was a far cry from a system that was both rewarding for mom and kid.
I then saw how people always try to hang their backpack on their chair but it never works, it always falls off. I realized that we don't have space for a bookshelf to put all of her stuff but we could modify a chair to do the same thing.
So this design has a notch that you can hang your backpack handle on, a little platform to support the bottom of the backpack or any other bag, and then wider shoulders to use as a hanger for a coat. The fingers of the shoulder design also allow you to hang multiple things on it such as other jackets etc. I added a little hole on the back platform that you can use to store an umbrella or a cup. I had added a few other features such as a shoe rest etc but I realized that they were not necessary and would hinder its functionality. On the bottom there is a platform for you to store shoes, lunch box, or even a fabric square box to store miscellaneous. The back of the chair, having that extra space helps to steady the chair against the weight of the backpack. If the backpack was super over packed, it should be moved to the front of the chair when you are not sitting in it to prevent it from tipping over. A 1st graders backpack had no problem on this chair but a middle school kid with all the textbooks, I would recommend that the backpack would be stored on the front of the chair when you're not sitting in it. 
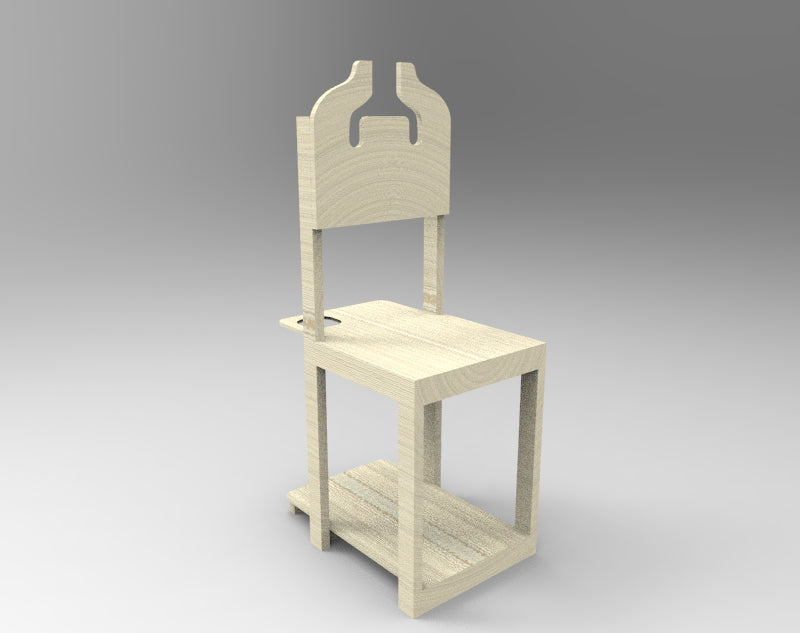
So once I had the basic thought in myhead, while I was in meetings, I began to sketch it out on a tablet and while she was at gymnastics I started researching dimensions and chairs etc and came upon Ana White's 2x4 chair. I use 3d modeling to build a lot so I began thinking about using 2x4's to build this chair in my head. I got the chair whipped up pretty quickly. I realized 2x4s are not only kinda ugly but also heavy and also unnecessary for a kids indoor chair. I was loving how it was coming together and it seemed like it might work out proportionally. This is the rendered model of the chair once I finished building it in 3D.

Tools that I used and I highly recommend you get if you are going to be DIYing around the house, you need to have a nail gun and Kreg K4 Pocket Hole System w/ Screw Kit in 5 Sizes and Face Clamp. For the nail gun I got a Ryobi nail gun and luckily already had a charger with the battery which <gasp> does not come with the cheapest available version of the nail gun. So to get the gun plus charger and battery is a bit costly but the nail gun is such a versatile tool to have and it sure beats using a hammer and nail almost ALL the time. The electric one is great because you don't need a compressor and I tried to use a compressor and it was super loud = does not work with having children. The Kreg pocket hole kit has some really cool things it comes with - it's sort of a starter kit and it comes with plans for other projects as well. I would definitely recommend the starter kit but you can also make do with just the drill jig and separate Kreg pocket screws.
At this point, I'm regularly going to Home Depot and I don't know what it is about that store but I get intimidated so I end up not getting all that I need or I get too many things because I'm worried I won't have what I need at home. For wood for this project, I bought some inexpensive 1x2's (or 2x1's??) which made a lot more sense scale-wise than 2x4s and also some plywood (4x8 sheets of 1/4 and 1/8 in). I had them cut in half at the back of the store to make it easier to carry in the minivan.
So, yeah, the funny thing is the people, i.e. hot and handy moms, that make chairs and furniture in their spare time, they have these things....and in my creative line of work, investing in this type of equipment is par for the course..and kinda fun, it definitely gave me the DIY bug! I used a saw (miter or table) and a band saw (you could get away with using a jig saw). I also used a drill press but a drill with a Forstner bit on it for the cup hole/umbrella holder would do just fine.
Ok so this is the assembled chair before sanding, priming, etc.

You have to read up on Kreg pocket joinery or just buy the kit and you'll figure it out with the manual. Having never done Kreg and being bewildered and scared off by the word 'joinery', I actually walked away with much respect for the pocket screw method and it wasn't as bad as I thought it would be. Well okay, here is a tip - in the few blogs I read that did the Kreg joinery to make a kids chair, they were sorta pocket screwing willy nilly and it ended up causing there to be a traffic jam of wood screws. I ONLY used the Kreg pocket screws to join two wide pieces of wood together - so for example a cross piece connected to the narrower side of the 2x1 - The nail gun isn't going to go through that 2x1 and make a solid contact, so the pocket screws are necessary for that, they pull the two pieces tightly together. However in any other situation, if it can be nail gunned, I would suggest nail gunning it. Too many pocket screws will weaken the piece and also the piece can chip at the ends. If I was joining a cross piece to the narrower side of the 2x1, I nail gunned through the 1 in to connect to the cross piece. Hope that helps. In other words, the only places I did Kregg were in the two lateral side supports for the seat, 2 on each end, totaling 8 Kregg screws per chair.
After the assembly, I sanded it with 600 and 180 grit and then primed it with Zinsser primer.


It is cheap and it is really thick and easy to sand. You need good primer for poor quality wood. I had bought the plywood that is not meant for finished level work (not getting the right words here) and the guy at HD had recommended it bc he said it was stronger but it was actually quite a bear to patch and finish. I wish I had gotten the pretty plywood instead. Even several coats of primer, sanding and paint and you can see still the texture in that plywood. I did sand over the primer to smooth out some areas.
Here are some pics of my daughter joining in on the process.

This is the painting of the chairs over the primer.

Yes, so there are three chairs. I was making one chair and then realized...well my 4 year old will want one...and then...I never want to make one of these again...I should just make one for 'the boy' our term of endearment for our baby boy when he gets older. So, I just went all cray cray and just did all 3 at one time. It was fun. It took me about 1.5 weeks of working on it about 2 hours a day...and to make 3 chairs. So it would take about 3 days to do this and you could do this all in 2 days of non stop work.
So, for the full cut list, it is in the downloadable pdf you will receive if you subscribe below. As far as wood, I used 2x1s that I got in a pack of 12 at Home Depot. They were pre milled and I didn't joint them so I just accepted any warping or bowing in them, only a few had some warp. They were not quality hard woods....there were two that splintered when I put pocket screws in them, these were ones that were cut so that a corner was outside of a growth ring, the corner would just split off. I ended up using wood glue to secure it back into place but it wasn't ideal. If you can get better wood, I would recommend it. But I would say the total price tag for the wood was in the ballpark of $15 for one chair plus or minus $4.
Also, I used 1/4 in plywood for the back and seat and then 1/8th in plywood for the base. So, yeah! We put chair pads on the legs and they are amazing and I love the weight, it is lightweight but sturdy! I love that we don't need a space for bookshelves turned into an organizer and we always will need chairs for the kids. Chairs take up space anyways and are movable and this organizational setup works for our small house. One of the three I made I left the legs longer because I figured we will have one kid who is taller than the other two at some point and the might possibly want a chair that could transition into an adult chair. The dimensions I selected would allow for these to be used at both a kid table and at an adult table.


Well, if you are interested in trying this out, you can download it by subscribing to my blog below
Happy DIY-ing!
While you're here, browse my sweaters and bags I've designed in my store, you'll love them!
6 comments
I love this design. Great job…I am always struggling with my bags.